Automation of the issue of AdHoc build of the app from Xcode for installation on the device of the customer
I will Explain for beginners that when developing for iOS for installation on the device most of the time you assemble the application in development mode, i.e. only for themselves.
But at some point you want to start to give the customer the result of work on "see".
To do this, use a special view of the Assembly of AdHoc Distribution. You need to go to Apple and to create a distribution provisioning profile. Then build the application: by signing this profile. The profile spells out all the IDs of the devices on which you want this app to install at this stage. As a result, when build under AdHoc, XСode creates a file with the extension .ipa can be installed on all prescribed in the profile, the devices. For example using iTunes.
The question arises how best to tell your client the resulting Assembly. Yes, you can just send the file via email for example, or to lay out on file sharing and let the poor bastard installs it via iTunes on your device. But if you value your time your client or you are too lazy to explain to him how to do it well, or are you just a sweet and nice person, then you should think about, is there no other, more convenient method.
One of such ways, with automation of the issuance of Xcode read under the cut!
On this path have long trades enough hangers, which are admittedly quite bad cope with this task. One of the distinguished services is such as TestFlight. The point is that they allow your customers (or beta testers) to install your app through their service. To do this, all beta testers should install on their devices their app. In the future, when they receive a notification about the release of your next build — they run this application, find your updated and install it yourself via its interface.
But this scheme, I would say, not perfect.
First, it implies that you still have to explain to the customer how to register in TestFlight how to install them yourself (it's not in the AppStore, installing from their website).
Also in this case, we do not simplify their life by your side — every time you need to first collect the next AdHoc build in Xcode, then in the Organizer window, select AdHoc distribution, to specify the correct profile and save .ipa file to disk. Then go to the TestFlight website and upload this .ipa, write a review, don't forget to set the permissions for those to whom this build is designed. Lots and lots of gestures.
In addition, often the service is not available, or just the download speed is such that the application installation process falls on timeout.
Especially not nice sometimes to hear from a customer that your app is somehow not set when you know exactly what it is not, and you checked downloading from TestFlight itself.
In the end the last straw for me was the fact that they have not yet support the installation on iOS7, which we are developing our latest project.
And then we came to the decision that it was easier for both parties.
Now all the above procedure boils down to two steps. I choose in Xcode archive build (so Assembly is usually collected under AdHoc). Then write to the customer what the app is updated. All.
Now the customer just comes from your device at a specific address on the Internet (the address does not change and he can save it as a bookmark). He's got a pop-up appears — do you want to install the application, he of course wants, the application is installed. All happy.
And here's what you need to do to come to this Nirvana.
the
First, a bit about the magic that allows you to install applications by URL.
It's a long time ago there is a possibility, and it is actually based all of these services Ala TestFlight.
There is a Protocol itms-services:, which iOS in particular is installing apps from the browser. The Protocol implies that will be loaded .the plist file has a certain structure, where, in particular, is specified and the reference .ipa file. As a result, it is handled by iOS as a request to install the application.
Here I imply that for such storage uses Amazon S3 storage. Create an account on Amazon Web Services simple and I am not going to describe it. Storage and distribution of such scanty volumes will leave you some pennies, which I was lazy to count here is not about that.
So create our files, so can look our HTML. Let's call it, say index.html. The main thing that it were a reference to itms-services: the Protocol
the
As you can see here embedded list, because we don't want to be limited to only one application, we do have a couple. And each of them is installed on a separate link.
In the itms-services://... you only need to change mybucketname and the name .the plist file. I.e., replace them by respectively the name of your bucket on Amazon S3 where all you do is fold, and the name of your .plist (the file name is irrelevant and may not match with application name).
Himself .the plist looks like this:
the
Of course, there is also a need to replace the name mybucketname key string software-package. And indicate your title .ipa file is MyApp1.ipa. And don't forget to change the key string bundle-identifier. Is com.mycoolcompanyname.myapp1 enter your bundle id that you used to build this application in Xcode.
Well, specify the application name in the key title.
Great! Now you can collect the application for AdHoc distribution and handles vykladyvaete it on this S3 bucket. After which it will be possible to establish the link mybucketname.s3.amazonaws.com/index.html opening it in your browser.
By the way for manual filling on S3 this app is CyberDuck. He stopped there, as the most convenient option under MacOs.
One important detail, do not forget to set access rights .ipa file to public-read. This is done in CyberDuck, right-click on the file > Info to add to the group, Everybody with Read rights.
However, this option is also not for the lazy, so go ahead.
the
To absolutely nothing I had to do, we can write a small script.
In Xcode there is an opportunity to cram their scripts in almost all stages during application Assembly.
We, in this case, is only interested in the Assembly in the archive (so we always collect the application for AdHoc Distribution).
So add a post action at the final stage for this scheme.
Go to Xcode, open the edit dialog of the schemes. Next will be a few explanatory screenshots. They are made in beta version of Xcode 5, but Xcode 4.6 this feature is also present, and the interface in this part is virtually identical.
So we click the name of your target in the place where it appears in the upper left of the main window of Xcode. In the dialog that appears, select Edit Scheme...
In the edit dialog diagrams find the diagram Arhive and click the small triangle next to its name, will unfold a few paragraphs. The last of them and will we need Post-actions.
In Vabaduse in this window, select the name of your target. This means that all variables in the script, like ${PRODUCT_NAME} for example, will be taken corresponding to it.
Here's a skipt we use:
the
So in the opened window you can see /bin/sh in first line of input. Leave there the value.
In the empty field at the bottom copypaste this script.
Now we have to edit a few values in it for your configuration. Namely, it is necessary to prescribe the correct value to the variable SIGNING_IDENTITY and prescribe the correct link to your current provisioning profile in PROVISIONING_PROFILE variable.
I'm doing this right. Stored here — you press OK at the bottom, go in the Build Settings of the project and find the section Code Signing Identity.
It has all the desired values. But "helpful" Xcode displays them in human-readable form and also does not highlight right there.
Right click on the name of your signing identity (something like iPhone Distribution:...). Opens a pop-up in which at the bottom is the Other option... Select it and here it is our entire set of parameters in text form and even carefully selected.
In previous versions of Xcode it looked like this:
the
Accordingly, the first line fits in SIGNING_IDENTITY variable in the script.
And the second is the code of your profile — just replace the highlighted part in the address to PROVISIONING_PROFILE variable, as shown below.
PROVISIONING_PROFILE="${HOME}/Library/MobileDevice/Provisioning Profiles/20DB9849-4CFE-4005-81F6-1A594119839B.mobileprovision"
In the new Xcode 5, these two values are posted to a single record in the section Code Signing Identity. Therefore, the same action needs to be done twice. First copy the name of identity, then the code for the provisioning profile.
As you can see, the script performs two simple actions. First, the resulting Assembly .app file turns into a .ipa. Then this .ipa is uploading to S3. In the process the script also created .log file where is written everything that happens. This .log file is placed in a temporary folder (the same way .ipa) and opens the system utility Console so we can see the progress of the script.
There is only one mystery — how does the fill to S3.
the
Actually not really, won't bother with manual fill on S3, it is troublesome, use this ready-made utilitly (S3cmd).
We're on a Mac, so we put her through MacPorts. Who does not know, is a tool that allows you to put on the Mac all the inherent delights of Linux. If you have not installed MacPorts — put on one of the links for your version of MacOS (Mountain Lion, Lion or Snow Leopard).
Next, put the very utility s3cmd. With MacPorts this is done very simply.
In terminal typed:
the
You will be prompted to enter a password, enter the administrator password and the installation will begin. It takes about a minute.
All utility installed, now let's say our password from S3 (when you register on Amazon Web Services) will give you the key and secret code (don't ask what the difference is between these two concepts, but both are needed).
So type in a terminal:
the
and we are asked to answer a few questions with regards to our desired configuration, including will be asked to enter the key and secret code.
For example, it looks like this:
the
Well that's all, now the script only need to correct the name of your S3 bucket and application name in the string:
/opt/local/bin/s3cmd put --acl-public --force --guess-mime-type /tmp/${PRODUCT_NAME}.ipa "s3://mybucketname/MyApp.ipa" >> $LOG
Then you can just run the build under archive (Xcode > Product > Archive) and it should work. Your application will be filled at the specified address.
Article based on information from habrahabr.ru
But at some point you want to start to give the customer the result of work on "see".
To do this, use a special view of the Assembly of AdHoc Distribution. You need to go to Apple and to create a distribution provisioning profile. Then build the application: by signing this profile. The profile spells out all the IDs of the devices on which you want this app to install at this stage. As a result, when build under AdHoc, XСode creates a file with the extension .ipa can be installed on all prescribed in the profile, the devices. For example using iTunes.
The question arises how best to tell your client the resulting Assembly. Yes, you can just send the file via email for example, or to lay out on file sharing and let the poor bastard installs it via iTunes on your device. But if you value your time your client or you are too lazy to explain to him how to do it well, or are you just a sweet and nice person, then you should think about, is there no other, more convenient method.
One of such ways, with automation of the issuance of Xcode read under the cut!
On this path have long trades enough hangers, which are admittedly quite bad cope with this task. One of the distinguished services is such as TestFlight. The point is that they allow your customers (or beta testers) to install your app through their service. To do this, all beta testers should install on their devices their app. In the future, when they receive a notification about the release of your next build — they run this application, find your updated and install it yourself via its interface.
But this scheme, I would say, not perfect.
First, it implies that you still have to explain to the customer how to register in TestFlight how to install them yourself (it's not in the AppStore, installing from their website).
Also in this case, we do not simplify their life by your side — every time you need to first collect the next AdHoc build in Xcode, then in the Organizer window, select AdHoc distribution, to specify the correct profile and save .ipa file to disk. Then go to the TestFlight website and upload this .ipa, write a review, don't forget to set the permissions for those to whom this build is designed. Lots and lots of gestures.
In addition, often the service is not available, or just the download speed is such that the application installation process falls on timeout.
Especially not nice sometimes to hear from a customer that your app is somehow not set when you know exactly what it is not, and you checked downloading from TestFlight itself.
In the end the last straw for me was the fact that they have not yet support the installation on iOS7, which we are developing our latest project.
And then we came to the decision that it was easier for both parties.
Now all the above procedure boils down to two steps. I choose in Xcode archive build (so Assembly is usually collected under AdHoc). Then write to the customer what the app is updated. All.
Now the customer just comes from your device at a specific address on the Internet (the address does not change and he can save it as a bookmark). He's got a pop-up appears — do you want to install the application, he of course wants, the application is installed. All happy.
And here's what you need to do to come to this Nirvana.
the
Magic install apps via mobile browser.
First, a bit about the magic that allows you to install applications by URL.
It's a long time ago there is a possibility, and it is actually based all of these services Ala TestFlight.
There is a Protocol itms-services:, which iOS in particular is installing apps from the browser. The Protocol implies that will be loaded .the plist file has a certain structure, where, in particular, is specified and the reference .ipa file. As a result, it is handled by iOS as a request to install the application.
Here I imply that for such storage uses Amazon S3 storage. Create an account on Amazon Web Services simple and I am not going to describe it. Storage and distribution of such scanty volumes will leave you some pennies, which I was lazy to count here is not about that.
So create our files, so can look our HTML. Let's call it, say index.html. The main thing that it were a reference to itms-services: the Protocol
the
<html>
<head>
<title>My Ad-Hoc Distribution Site</title>
<style>
li{font-size:60pt margin:20px 0}
</style>
<meta name="viewport" content="width=device-width" />
<meta name="apple-mobile-web-app-capable" content="yes" />
</head>
<body>
<ul>
<li><a href="itms-services://?action=download-manifest&url=http://mybucketname.s3.amazonaws.com/MyApp1.plist">
To install my app MyApp1</a></li>
<li><a href="itms-services://?action=download-manifest&url=http://mybucketname.s3.amazonaws.com/MyApp2.plist">
Install my another application MyApp2</a></li>
</ul>
</body>
</html>
As you can see here embedded list, because we don't want to be limited to only one application, we do have a couple. And each of them is installed on a separate link.
In the itms-services://... you only need to change mybucketname and the name .the plist file. I.e., replace them by respectively the name of your bucket on Amazon S3 where all you do is fold, and the name of your .plist (the file name is irrelevant and may not match with application name).
Himself .the plist looks like this:
the
<?xml version="1.0" encoding="UTF-8"?>
<!DOCTYPE plist PUBLIC "-//Apple//DTD PLIST 1.0//EN" "http://www.apple.com/DTDs/PropertyList-1.0.dtd">
<plist version="1.0">
<dict>
<key>items</key>
<array>
<dict>
<key>assets</key>
<array>
<dict>
<key>kind</key>
<string>software-package</string>
<key>url</key>
<string>http://mybucketname.s3.amazonaws.com/MyApp1.ipa</string>
</dict>
</array>
<key>metadata</key>
<dict>
<key>bundle identifier</key>
<string>com.mycoolcompanyname.myapp1</string>
<key>bundle version</key>
<string>1.0</string>
<key>kind</key>
<string>software</string>
<key>title</key>
<string>MyApp1</string>
</dict>
</dict>
</array>
</dict>
</plist>
Of course, there is also a need to replace the name mybucketname key string software-package. And indicate your title .ipa file is MyApp1.ipa. And don't forget to change the key string bundle-identifier. Is com.mycoolcompanyname.myapp1 enter your bundle id that you used to build this application in Xcode.
Well, specify the application name in the key title.
Great! Now you can collect the application for AdHoc distribution and handles vykladyvaete it on this S3 bucket. After which it will be possible to establish the link mybucketname.s3.amazonaws.com/index.html opening it in your browser.
By the way for manual filling on S3 this app is CyberDuck. He stopped there, as the most convenient option under MacOs.
One important detail, do not forget to set access rights .ipa file to public-read. This is done in CyberDuck, right-click on the file > Info to add to the group, Everybody with Read rights.
However, this option is also not for the lazy, so go ahead.
the
automation in Xcode. Write post-actions script.
To absolutely nothing I had to do, we can write a small script.
In Xcode there is an opportunity to cram their scripts in almost all stages during application Assembly.
We, in this case, is only interested in the Assembly in the archive (so we always collect the application for AdHoc Distribution).
So add a post action at the final stage for this scheme.
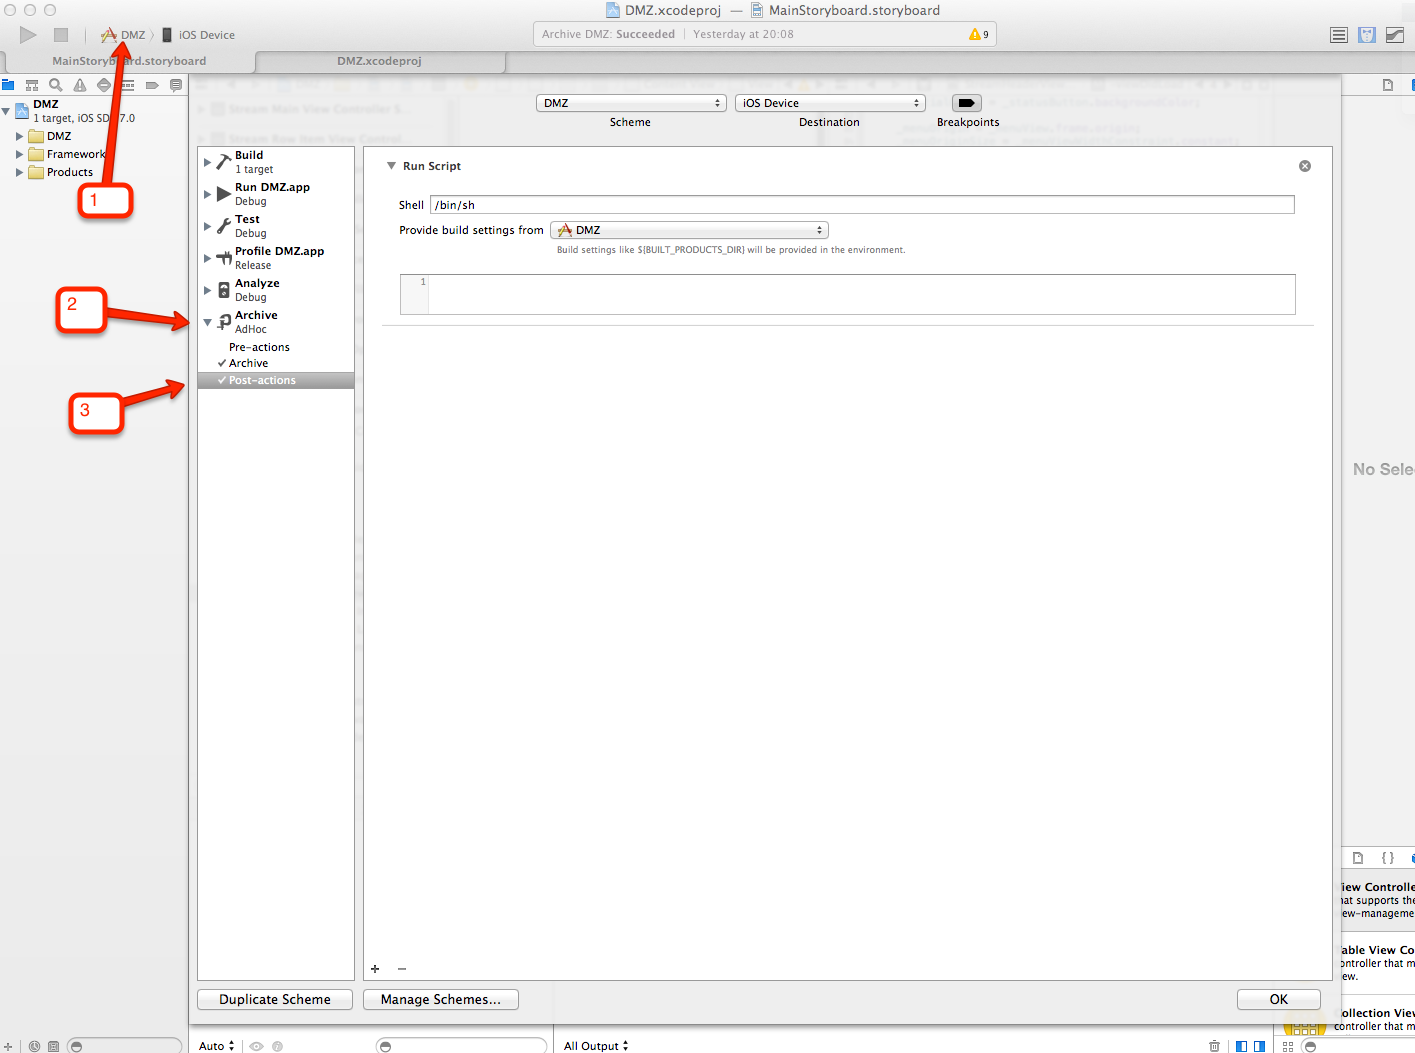
Go to Xcode, open the edit dialog of the schemes. Next will be a few explanatory screenshots. They are made in beta version of Xcode 5, but Xcode 4.6 this feature is also present, and the interface in this part is virtually identical.
So we click the name of your target in the place where it appears in the upper left of the main window of Xcode. In the dialog that appears, select Edit Scheme...
In the edit dialog diagrams find the diagram Arhive and click the small triangle next to its name, will unfold a few paragraphs. The last of them and will we need Post-actions.
In Vabaduse in this window, select the name of your target. This means that all variables in the script, like ${PRODUCT_NAME} for example, will be taken corresponding to it.
Here's a skipt we use:
the
SIGNING_IDENTITY="iPhone Distribution: MyCoolCompanyName (G4DHGXDY2)"
PROVISIONING_PROFILE="${HOME}/Library/MobileDevice/Provisioning Profiles/20DB9849-4CFE-4005-81F6-1A594119839B.mobileprovision"
LOG="/tmp/post-build-upload-to-s3.log"

DATE=$( /bin/date +"%Y-%m-%d" )
ARCHIVE=$( /bin/ls-t "${HOME}/Library/Developer/Xcode/Archives/${DATE}" | /usr/bin/grep xcarchive | /usr/bin/sed -n 1p )
DSYM="${HOME}/Library/Developer/Xcode/Archives/${DATE}/${ARCHIVE}/dSYMs/${PRODUCT_NAME}.app.dSYM"
APP="${HOME}/Library/Developer/Xcode/Archives/${DATE}/${ARCHIVE}/Products/Applications/${PRODUCT_NAME}.app"

/usr/bin/open -a /Applications/Utilities/Console.app $LOG

echo-n "Creating .ipa for ${PRODUCT_NAME}... " > $LOG

/bin/rm "/tmp/${PRODUCT_NAME}.ipa"
/usr/bin/xcrun -sdk iphoneos PackageApplication "${APP}" -o "/tmp/${PRODUCT_NAME}.ipa" --sign "${SIGNING_IDENTITY}" --embed "${PROVISIONING_PROFILE}" >> $LOG


echo "Created .ipa for ${PRODUCT_NAME}" >> $LOG

echo-n "Uploading to S3..." >> $LOG

/opt/local/bin/s3cmd put --acl-public --force --guess-mime-type /tmp/${PRODUCT_NAME}.ipa "s3://mybucketname/MyApp.ipa" >> $LOG

echo "Done." >> $LOG
/usr/bin/open "https://basecamp.com/path-to-your-project-to-let-people-know-of-new-build"
So in the opened window you can see /bin/sh in first line of input. Leave there the value.
In the empty field at the bottom copypaste this script.
Now we have to edit a few values in it for your configuration. Namely, it is necessary to prescribe the correct value to the variable SIGNING_IDENTITY and prescribe the correct link to your current provisioning profile in PROVISIONING_PROFILE variable.
I'm doing this right. Stored here — you press OK at the bottom, go in the Build Settings of the project and find the section Code Signing Identity.
It has all the desired values. But "helpful" Xcode displays them in human-readable form and also does not highlight right there.
Right click on the name of your signing identity (something like iPhone Distribution:...). Opens a pop-up in which at the bottom is the Other option... Select it and here it is our entire set of parameters in text form and even carefully selected.
In previous versions of Xcode it looked like this:
the
iPhone Distribution: MyCoolCompanyName (G4DHGXDY2)
20DB9849-4CFE-4005-81F6-1A594119839B
Accordingly, the first line fits in SIGNING_IDENTITY variable in the script.
And the second is the code of your profile — just replace the highlighted part in the address to PROVISIONING_PROFILE variable, as shown below.
PROVISIONING_PROFILE="${HOME}/Library/MobileDevice/Provisioning Profiles/20DB9849-4CFE-4005-81F6-1A594119839B.mobileprovision"
In the new Xcode 5, these two values are posted to a single record in the section Code Signing Identity. Therefore, the same action needs to be done twice. First copy the name of identity, then the code for the provisioning profile.
As you can see, the script performs two simple actions. First, the resulting Assembly .app file turns into a .ipa. Then this .ipa is uploading to S3. In the process the script also created .log file where is written everything that happens. This .log file is placed in a temporary folder (the same way .ipa) and opens the system utility Console so we can see the progress of the script.
There is only one mystery — how does the fill to S3.
the
Fill Assembly on Amazon S3 using the script
Actually not really, won't bother with manual fill on S3, it is troublesome, use this ready-made utilitly (S3cmd).
We're on a Mac, so we put her through MacPorts. Who does not know, is a tool that allows you to put on the Mac all the inherent delights of Linux. If you have not installed MacPorts — put on one of the links for your version of MacOS (Mountain Lion, Lion or Snow Leopard).
Next, put the very utility s3cmd. With MacPorts this is done very simply.
In terminal typed:
the
sudo port install s3cmd
You will be prompted to enter a password, enter the administrator password and the installation will begin. It takes about a minute.
All utility installed, now let's say our password from S3 (when you register on Amazon Web Services) will give you the key and secret code (don't ask what the difference is between these two concepts, but both are needed).
So type in a terminal:
the
s3cmd --configure
and we are asked to answer a few questions with regards to our desired configuration, including will be asked to enter the key and secret code.
For example, it looks like this:
the
Enter new values or accept defaults in brackets with Enter.
Refer to user manual for detailed description of all options.

Access key and Secret key are your identifiers for Amazon S3
Access Key: Highhats should be your kuchchh
Secret Key: Uuuuus should be your secretyou

Encryption password is used to protect your files from reading
by unauthorized persons while in transfer to S3
Encryption password:
Path to GPG program:

When using secure HTTPS protocol all communication with Amazon S3
servers is protected from 3rd party eavesdropping. This method is
slower than plain HTTP and can't be used if you're behind a proxy
Use HTTPS protocol [No]: No

On some networks all internet access must go through a HTTP proxy.
Try setting it here if you can't conect to S3 directly
HTTP Proxy server name:

New settings:
Access Key: Hhhhhaaaaaa again your kuchchh
Secret Key: again Uwwumoyzff your secretyou
Encryption password:
Path to GPG program: None
Use HTTPS protocol: False
HTTP Proxy server name:
HTTP Proxy server port: 0

Test access with supplied credentials? [Y/n] Y
Please wait...
Success. Your access key and secret key worked fine :-)

Now verifying that encryption works...
Not configured. Never mind.

Save settings? [y/N] y
Configuration saved to '/Users/st/.s3cfg'
Well that's all, now the script only need to correct the name of your S3 bucket and application name in the string:
/opt/local/bin/s3cmd put --acl-public --force --guess-mime-type /tmp/${PRODUCT_NAME}.ipa "s3://mybucketname/MyApp.ipa" >> $LOG
Then you can just run the build under archive (Xcode > Product > Archive) and it should work. Your application will be filled at the specified address.


Комментарии
Отправить комментарий