Develop a simple Eclipse RCP application
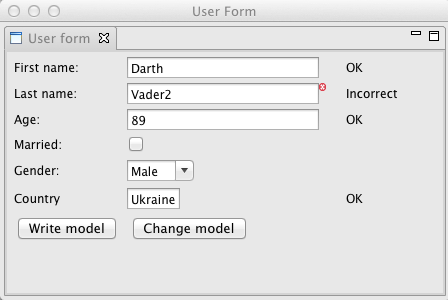
this article I wanted to talk about how to create applications using the Eclipse RCP (Rich Client Platform). The reason for writing was the fact that on habré absolutely no articles that describe the platform. As an example, we'll create a custom input form; the accuracy of the data will be checked using JFace Data Binding framework. For starters here are a screenshot with what we should get.
What is Eclipse RCP
Pros and cons platforms
Begin work
Installing plugins
creating a project
project Structure
Launch project
adding a view (view)
Add extension
configure
layouts
Launch app-added
Links to helpful resources
For a start, it is still necessary to say what is Eclipse RCP. Eclipse is a development environment written in Java, developed and supported by the Eclipse Foundation (which includes IBM, SAP, Oracle, and companies offering products based on Eclipse RCP and participating in the development of the ecosystem Google, RedHat, Adobe, Cisco, Intel). Eclipse RCP is a set of plugins to create so-called rich client application. All that the user sees, opening the Eclipse IDE is a plugin created based on this platform. The user can create their own plugins based on the huge number of already existing, and if necessary, you can find most of the popular frameworks such as Hibernate, Google Guice, Google Guava, JUnit, TestNG in the form of plugins. It is also worth noting that the run-time architecture based on the specification of service platform OSGI, this specification describes how to create and operate modular applications. Eclipse, as mentioned above, is written in Java and is positioned as a cross-platform product (in 90% of cases the RCP application will gather on Windows, Linux and Mac). All the plugins that make up the core of the platform, and most third-party plugins are licensed under the EPL (Eclipse Public License). UI RCP application based on visual components, frameworks, SWT and JFace on Eclipse widgets. The drawings below show you which components make up the application based on the RCP platform, and the structure of the Eclipse platform.
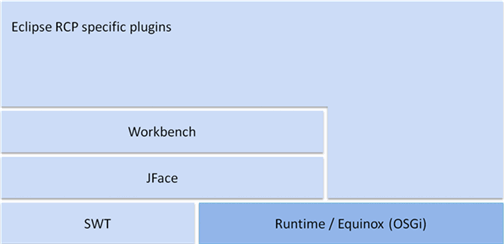
Figure 1 — Components used in a RCP application (figure taken from this site)

Figure 2 – the Eclipse Architecture (figure taken from this site)
The main question — what is so good about this platform and why use it for developing desktop applications (by the way, it is possible to develop web applications and apps for mobile platforms). Modularity, cross-platform, multilingual support, free of charge huge amount of available plugins, libraries and mangarakau. All this allows you to create applications commercial level (link to the list of existing applications developed on this platform are given at the end of the article). The disadvantages include the relatively high level of entry, so as to develop a serious application, you need to know at least in General terms, how does the OSGI framework, able to work with components and widgets in SWT and JFace. Also for Russian-speaking developers, the problem is to find any materials or books about the above mentioned frameworks and libraries (links to resources are found, including on Russian, found at the end of the article), although in Europe and the United States periodically held conference organized by the participants of the Eclipse Foundation in Germany published a special magazine about the new plug-ins and contains a lot of examples of their application, and there is a whole series of books in German, which describes all the nuances and intricacies of the development. In English you can find the special book series eclipse series publisher Addison-Wesley, you can also find a couple of books from the publisher Apress. But in our native language materials and books is negligible.
Let's move on to creating our first RCP application. For work, we need to download the Assembly: Eclipse for RCP and RAP Developers c the official website. If Eclipse IDE is already installed, you can use the update Manager. Choose in main menu Help->Install New Software. In the window Install the top choose from the dropdown list the desired site updates download.eclipse.org/releases/indigo, if such site is not in the list, then click the right Add button in the Name field write – Indigo Update Site in the field Location – address listed above, click OK (if the address is added to the message – Duplicate location, then the address already exists in the list of Available Software Sites the list of update sites can be viewed in the previous window Install, if you click on the link Available Software Sites, which is under the drop-down list). After selecting the update site, displayed in the lower tree-list (if you marked the checkbox Group items by category), open the item General Purpose Tools and choose Eclipse Plug-in Development Environment, then open the paragraph EclipseRT Target Platform Components and mark the plugin Eclipse RCP Plug-in Developer Resources, these two plug-ins we need to create our project. Then click two times "Next", accept license agreement and click the Finish button; all will start installing the required plugins. After installation we will be prompted to restart Eclipse, we will do that.

Figure 3 – Window installer plugins
After reboot choose menu item File- > New- > Other, select Plug-in Development, next, in the drop-down menu note Plug-in Project.
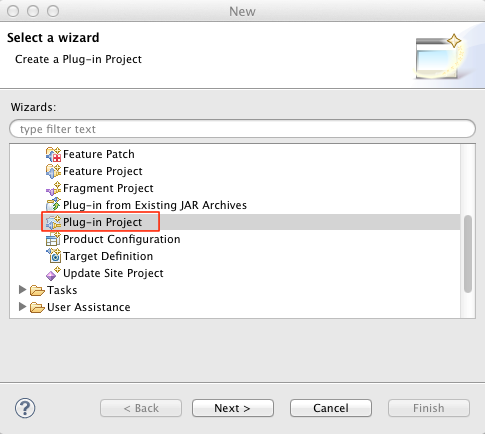
Figure 4 – Menu to choose the type of project
Press Next, we need to name our project, let it will be called first.rcp.application, again press Next. In the next window we need to specify the application name in the Name field, write the First RCP Application. Remove the check mark from the item Generate an activator, a Java class that controls the plug-in's life cycle; for our simple application class the activator is not needed. Leave a check on the item — This plug-in will make contributions to the UI, since our application will contain the user interface. Leave the third item Enable API Analysis unchecked. The question — Would you like to create a rich client application? answer Yes.
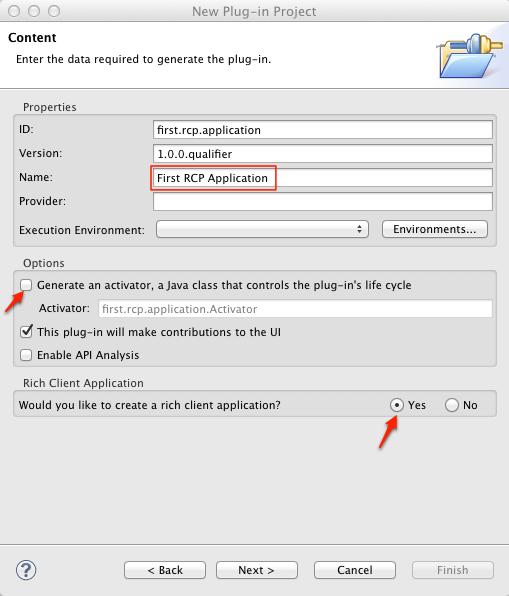
Figure 5 – the Window of creation of plugin
Press Next we will be prompted to select a template for future applications, choose the Hello RCP and click Next.
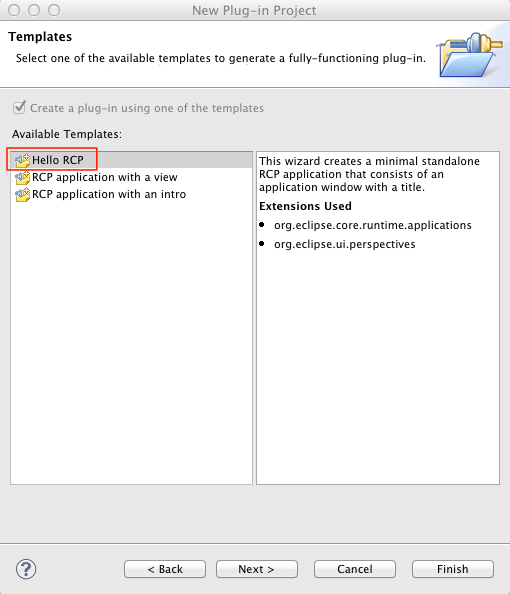
Figure 6 — the Window of choice of template RCP of the project
In the last window, the Application window title will write — User Form, in the Application class MyApplication. The Add branding check box leave inactive. Press the Finish button. We will be asked to switch to the perspective Plug-in Development perspective, you will agree with this proposal.
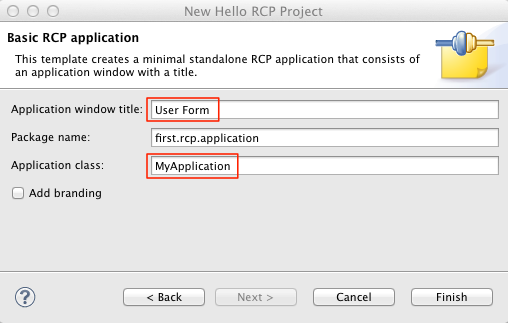
Figure 7 — configuration Window template RCP of the project
So we have before us the structure of your newly created project.
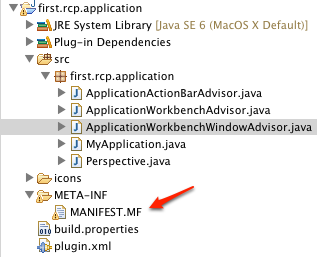
Figure 8 – the structure of the project
The content of the five classes in the package first.rcp.application currently we do not iteresuet, I can only say that the class MyApplication is a kind of method main() the usual Java program, this class is responsible for how will run our plugin and how it will be stopped. ApplicationWorkbenchWindowAdvisor, we can set the size of the application window by using the following line of code:
We can also see that, by default, will not show the toolbar and status bar:
The last line sets the title of the main window:
In order to run the newly created app, we need to navigate to the folder META-INF and open the file MANIFEST.MF, if you suddenly closed it (this file opens by default when creating the project).
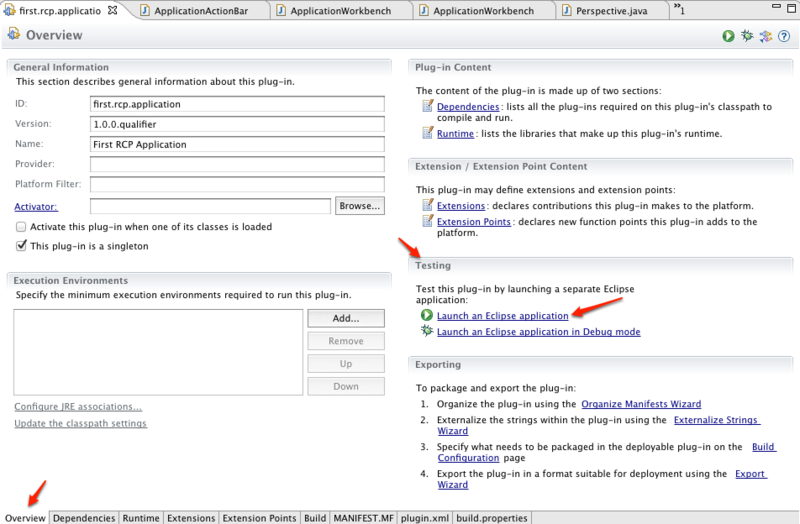
Figure 9 – properties Editor RCP application
This file allows us to change a project settings, you to connect additional plug-ins, to connect and manage extensions, configure the build of our plugin and much more. We are at the tab Overview, in section Testing click on the link Launch an Eclipse application, in a moment will appear on the screen window of our application, close it and move on to the next stage.

Figure 10 – Window of our application.
Our task is to create representation (view) on which we can place the GUI elements. Let us turn again to the file MANIFEST.MF, choose the bottom of the tab – Extensions. We see that by default we have two extensions: org.eclipse.core.runtime.applications and org.eclipse.ui.perspectives. The first extension is associated with the class of our app MyApplication, if we choose the extension and deploy the tree to the node list first.rcp.application.MyApplication (run), we see that the class field contains the name of this class. Returning to the root node of the list to the right, under Extension Details we will see two fields whose values we can change (not doing this now): ID – the application ID and Name is the name of the application.
The second extension is responsible for setting the perspective of our application. The file MANIFEST.MF allows us not looking at the class code Perspective, indicate which types and/or editors will include this perspective, their position, size and aspect ratio. Clicking on the extension and navigating to a child item, we will see that in the section Extension Element Details we can specify the class of prospects, the ID and name. It should be noted that such changes, as mentioned above, can be produced by editing directly the code of the class that is associated with the extension and edit the file plugin.xml, but do not want to complicate the creation of our first project.
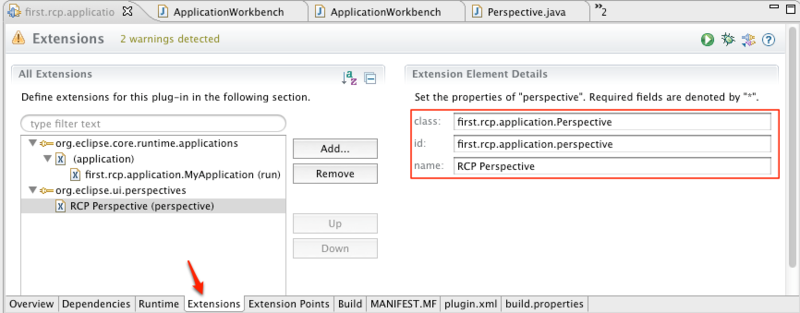
Figure 11 – Tab extensions of our project
We need to add a new extension to create the view. To do this, press the Add button and in the appeared window, in the Extension Point filter field, enter views must be only one extension – org.eclipse.ui.views, select it and click the Finish button.
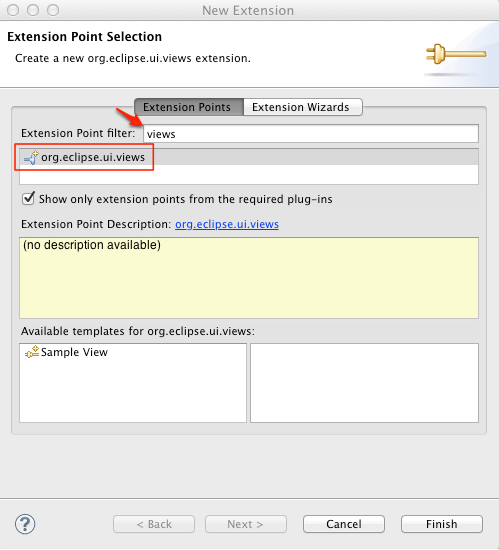
Figure 12 – selection Window, a new extension
In the list of extensions you should have another, the third extension.
Click on we added the extension, right-click, a context menu will appear, select New->view, thus we add the element to our extension (this element is necessary for us). In the right side you will see the settings of this element. To begin, create a class for our species. To do this, we can by clicking on the link to the class*.
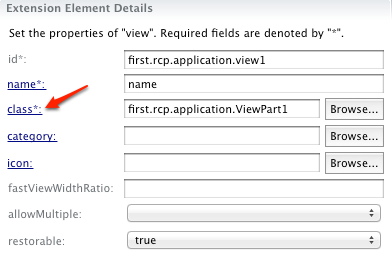
Figure 13 – Settings (view)
Opens a standard dialog box create a Java class, let's give him a name – MainView; as we can see, this class inherits from the class org.eclipse.ui.part.ViewPart, the parent class for all types. Finish creating the class by clicking on the Finish button. There are very few, after creating the class for our species before we open the code, create a static variable that will contain the ID of this species, as the identifier we specify the canonical name of this class. Write the following:
Vernemsya to the file MANIFEST.MF, open the Extension tab, copy the contents of the class field* and insert it into the ID field. Now the class name and the ID of this species are the same, this technique is a good practice because it always allows you to quickly find the desired view and to know its identifier. In the name field* will write – User Form. All views created, we have to associate it with our perspective as the view itself cannot be used, in other words, it must belong to a term.
Further manipulation we can produce while remaining in the editor extension or access code class prospects Perspective.java what we'll do. In the class Perspective, proceed in the method createInitialLayout () this method sets the starting position of the types and editors. In the method write the following two lines of code:
the
The first line tells the layout object that we want to edit, as we only have one view and no editors. The second line adds our species, and as an Autonomous (standalone). The first parameter is the ID of our species. The second parameter is a Boolean value, corresponding to the fact whether or not shows the title of our form (User Form). The third parameter is used to specify the view orientation in the future, as we have one and will take all the space perspective, this value can be anything. The fourth parameter determines the position of this view relative to other views or editors, as in our case, the view is one he should take all the space perspective. The last fifth parameter, the ID of the editing area (editor area). Save our changes.
Back to the file MANIFEST.MF and re-run our app, for this go to the tab Overview, in section Testing, click on the link Launch an Eclipse application. Large differences, however, looked like a form in a previous run, we do not see, added only a tab with our form – User Form.
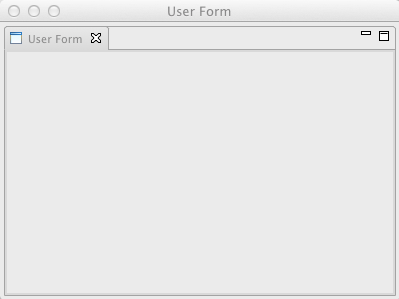
Figure 14 – Window of our application with the added
All for today, will be continued in the next article.
Archive with the source code of the project
Russian language:
the
English:
the
Article based on information from habrahabr.ru
What is Eclipse RCP
Pros and cons platforms
Begin work
Installing plugins
creating a project
project Structure
Launch project
adding a view (view)
Add extension
configure
layouts
Launch app-added
Links to helpful resources
What is Eclipse RCP
For a start, it is still necessary to say what is Eclipse RCP. Eclipse is a development environment written in Java, developed and supported by the Eclipse Foundation (which includes IBM, SAP, Oracle, and companies offering products based on Eclipse RCP and participating in the development of the ecosystem Google, RedHat, Adobe, Cisco, Intel). Eclipse RCP is a set of plugins to create so-called rich client application. All that the user sees, opening the Eclipse IDE is a plugin created based on this platform. The user can create their own plugins based on the huge number of already existing, and if necessary, you can find most of the popular frameworks such as Hibernate, Google Guice, Google Guava, JUnit, TestNG in the form of plugins. It is also worth noting that the run-time architecture based on the specification of service platform OSGI, this specification describes how to create and operate modular applications. Eclipse, as mentioned above, is written in Java and is positioned as a cross-platform product (in 90% of cases the RCP application will gather on Windows, Linux and Mac). All the plugins that make up the core of the platform, and most third-party plugins are licensed under the EPL (Eclipse Public License). UI RCP application based on visual components, frameworks, SWT and JFace on Eclipse widgets. The drawings below show you which components make up the application based on the RCP platform, and the structure of the Eclipse platform.
Figure 1 — Components used in a RCP application (figure taken from this site)
Figure 2 – the Eclipse Architecture (figure taken from this site)
the Pros and cons of the platform
The main question — what is so good about this platform and why use it for developing desktop applications (by the way, it is possible to develop web applications and apps for mobile platforms). Modularity, cross-platform, multilingual support, free of charge huge amount of available plugins, libraries and mangarakau. All this allows you to create applications commercial level (link to the list of existing applications developed on this platform are given at the end of the article). The disadvantages include the relatively high level of entry, so as to develop a serious application, you need to know at least in General terms, how does the OSGI framework, able to work with components and widgets in SWT and JFace. Also for Russian-speaking developers, the problem is to find any materials or books about the above mentioned frameworks and libraries (links to resources are found, including on Russian, found at the end of the article), although in Europe and the United States periodically held conference organized by the participants of the Eclipse Foundation in Germany published a special magazine about the new plug-ins and contains a lot of examples of their application, and there is a whole series of books in German, which describes all the nuances and intricacies of the development. In English you can find the special book series eclipse series publisher Addison-Wesley, you can also find a couple of books from the publisher Apress. But in our native language materials and books is negligible.
Start work
installing the required plugins
Let's move on to creating our first RCP application. For work, we need to download the Assembly: Eclipse for RCP and RAP Developers c the official website. If Eclipse IDE is already installed, you can use the update Manager. Choose in main menu Help->Install New Software. In the window Install the top choose from the dropdown list the desired site updates download.eclipse.org/releases/indigo, if such site is not in the list, then click the right Add button in the Name field write – Indigo Update Site in the field Location – address listed above, click OK (if the address is added to the message – Duplicate location, then the address already exists in the list of Available Software Sites the list of update sites can be viewed in the previous window Install, if you click on the link Available Software Sites, which is under the drop-down list). After selecting the update site, displayed in the lower tree-list (if you marked the checkbox Group items by category), open the item General Purpose Tools and choose Eclipse Plug-in Development Environment, then open the paragraph EclipseRT Target Platform Components and mark the plugin Eclipse RCP Plug-in Developer Resources, these two plug-ins we need to create our project. Then click two times "Next", accept license agreement and click the Finish button; all will start installing the required plugins. After installation we will be prompted to restart Eclipse, we will do that.
Figure 3 – Window installer plugins
creating a project
After reboot choose menu item File- > New- > Other, select Plug-in Development, next, in the drop-down menu note Plug-in Project.
Figure 4 – Menu to choose the type of project
Press Next, we need to name our project, let it will be called first.rcp.application, again press Next. In the next window we need to specify the application name in the Name field, write the First RCP Application. Remove the check mark from the item Generate an activator, a Java class that controls the plug-in's life cycle; for our simple application class the activator is not needed. Leave a check on the item — This plug-in will make contributions to the UI, since our application will contain the user interface. Leave the third item Enable API Analysis unchecked. The question — Would you like to create a rich client application? answer Yes.
Figure 5 – the Window of creation of plugin
Press Next we will be prompted to select a template for future applications, choose the Hello RCP and click Next.
Figure 6 — the Window of choice of template RCP of the project
In the last window, the Application window title will write — User Form, in the Application class MyApplication. The Add branding check box leave inactive. Press the Finish button. We will be asked to switch to the perspective Plug-in Development perspective, you will agree with this proposal.
Figure 7 — configuration Window template RCP of the project
project Structure
So we have before us the structure of your newly created project.
Figure 8 – the structure of the project
The content of the five classes in the package first.rcp.application currently we do not iteresuet, I can only say that the class MyApplication is a kind of method main() the usual Java program, this class is responsible for how will run our plugin and how it will be stopped. ApplicationWorkbenchWindowAdvisor, we can set the size of the application window by using the following line of code:
configurer.setInitialSize(new Point(400, 300));We can also see that, by default, will not show the toolbar and status bar:
configurer.setShowCoolBar(false);

configurer.setShowStatusLine(false);
The last line sets the title of the main window:
configurer.setTitle("User Form");Launch project
In order to run the newly created app, we need to navigate to the folder META-INF and open the file MANIFEST.MF, if you suddenly closed it (this file opens by default when creating the project).
Figure 9 – properties Editor RCP application
This file allows us to change a project settings, you to connect additional plug-ins, to connect and manage extensions, configure the build of our plugin and much more. We are at the tab Overview, in section Testing click on the link Launch an Eclipse application, in a moment will appear on the screen window of our application, close it and move on to the next stage.
Figure 10 – Window of our application.
adding a view (view)
Add extension
Our task is to create representation (view) on which we can place the GUI elements. Let us turn again to the file MANIFEST.MF, choose the bottom of the tab – Extensions. We see that by default we have two extensions: org.eclipse.core.runtime.applications and org.eclipse.ui.perspectives. The first extension is associated with the class of our app MyApplication, if we choose the extension and deploy the tree to the node list first.rcp.application.MyApplication (run), we see that the class field contains the name of this class. Returning to the root node of the list to the right, under Extension Details we will see two fields whose values we can change (not doing this now): ID – the application ID and Name is the name of the application.
The second extension is responsible for setting the perspective of our application. The file MANIFEST.MF allows us not looking at the class code Perspective, indicate which types and/or editors will include this perspective, their position, size and aspect ratio. Clicking on the extension and navigating to a child item, we will see that in the section Extension Element Details we can specify the class of prospects, the ID and name. It should be noted that such changes, as mentioned above, can be produced by editing directly the code of the class that is associated with the extension and edit the file plugin.xml, but do not want to complicate the creation of our first project.
Figure 11 – Tab extensions of our project
We need to add a new extension to create the view. To do this, press the Add button and in the appeared window, in the Extension Point filter field, enter views must be only one extension – org.eclipse.ui.views, select it and click the Finish button.
Figure 12 – selection Window, a new extension
In the list of extensions you should have another, the third extension.
setting
Click on we added the extension, right-click, a context menu will appear, select New->view, thus we add the element to our extension (this element is necessary for us). In the right side you will see the settings of this element. To begin, create a class for our species. To do this, we can by clicking on the link to the class*.
Figure 13 – Settings (view)
Opens a standard dialog box create a Java class, let's give him a name – MainView; as we can see, this class inherits from the class org.eclipse.ui.part.ViewPart, the parent class for all types. Finish creating the class by clicking on the Finish button. There are very few, after creating the class for our species before we open the code, create a static variable that will contain the ID of this species, as the identifier we specify the canonical name of this class. Write the following:
...

public class MainView extends ViewPart {

public static final String ID = MainView.class.getCanonicalName();


}
Vernemsya to the file MANIFEST.MF, open the Extension tab, copy the contents of the class field* and insert it into the ID field. Now the class name and the ID of this species are the same, this technique is a good practice because it always allows you to quickly find the desired view and to know its identifier. In the name field* will write – User Form. All views created, we have to associate it with our perspective as the view itself cannot be used, in other words, it must belong to a term.
set location
Further manipulation we can produce while remaining in the editor extension or access code class prospects Perspective.java what we'll do. In the class Perspective, proceed in the method createInitialLayout () this method sets the starting position of the types and editors. In the method write the following two lines of code:
the
layout.setEditorAreaVisible(false);

layout.addStandaloneView(MainView.ID, true, IPageLayout.LEFT, 1.0 f, layout.getEditorArea());
The first line tells the layout object that we want to edit, as we only have one view and no editors. The second line adds our species, and as an Autonomous (standalone). The first parameter is the ID of our species. The second parameter is a Boolean value, corresponding to the fact whether or not shows the title of our form (User Form). The third parameter is used to specify the view orientation in the future, as we have one and will take all the space perspective, this value can be anything. The fourth parameter determines the position of this view relative to other views or editors, as in our case, the view is one he should take all the space perspective. The last fifth parameter, the ID of the editing area (editor area). Save our changes.
Launch app-added
Back to the file MANIFEST.MF and re-run our app, for this go to the tab Overview, in section Testing, click on the link Launch an Eclipse application. Large differences, however, looked like a form in a previous run, we do not see, added only a tab with our form – User Form.
Figure 14 – Window of our application with the added
All for today, will be continued in the next article.
Archive with the source code of the project
Links to useful resources
Russian language:
the
-
the
- Old tutorial, on this website you can find a half dozen good articles about developing Eclipse plugins and RCP applications. the
- Good article the layout of the components of the SWT framework; the
- Blog severe Chelyabinsk programmer, contains a large number inetersno of articles about Eclipse RCP and OSGI.
English:
the
-
the
- a Huge number excellent tutorials, on all the most popular plug-ins and frameworks, all written in great detail, it is clear even from the initial level of English; the
- Commercial projects written in Eclipse RCP.


Комментарии
Отправить комментарий